Thursday, May 30, 2013

Gatsby Style Jewelry

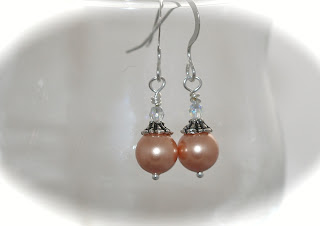
This past week I have been working on some new jewelry designs which I am calling my Gatsby Collection.  This is a collection of deco style jewelry inspired by the popular Gatsby style trend.

I gave these designs a bold and spirited look with the large glass beads and pearls, but added some softness with the spectacular antique brass curb chain.  This chain has the most unbelievable sheen to it and lies flat against the skin giving it a definite feminine and romantic look.


The earrings shown in the last photo are designed to be worn with any of the necklaces.  There are two styles of necklaces - long beaded strands and long pendant styles - these are made to be able to be worn alone or in layers.  I really like the layered look!

Right now I have placed these designs in Ruby's Gift of Charlotte, NC but will be making more soon to sell in my Etsy shop!  Here's a photo of my booth at Ruby's Gift - if you're ever in the area, be sure to visit!


Thanks so much for visiting!
Irene


Sunday, May 26, 2013

Trinkets from a Thrift Store

I went to a local thrift store today and ended up buying several trinkets that I hope to upcycle and alter into interesting jewelry displays.  The thrift store is Sweet Repeat Thrift Store in Lake Wylie, SC.  I always feel good about buying from them as this is a charitable non-profit organization run by volunteers.  All items sold there are donations from local residents.

Anyway here is what I came away with:

An old lampshade for $1.00.  I might end up removing the material and using the wire frame for a necklace and earring holder.


An old brass goblet - also $1.00.  It is very tarnished but still pretty.  I might actually paint over this and use as an earring display.


A brass candlestick holder for 50 cents.  It is very solid and heavy.  I also found the small brass drawer pull pictured beside the candle holder and went ahead and glued this to the top (see second photo below) ... it matches perfectly and will make a great weighted piece for draping necklaces around and letting them hang from a shelf in a store where I sell my jewelry.


A pair of candlestick holders for $2.00.  Not sure what I will do with these, but surely something will come to mind.

I will post some pictures of my finished alterations when done - hopefully along with some new jewelry designs I am working on from what I am calling my Gatsby Collection!

Wednesday, May 22, 2013

Wedding Day


 Last week I posted about our preparations for my oldest son Jon's wedding.  Well it's over and it went off without any glitches!  I absolutely am thrilled with how well it went.

The theme was a southern vintage style.  We held the wedding outside at the beautiful Alexander Homestead in Charlotte, North Carolina.  This is a historical site with a very old home that has been converted to a venue mainly for weddings.  The grounds include a beautiful gazebo and garden.  The reception took place in the on-site spectacular rustic but elegant "barn" - not a true barn but barn style building.

Here are some pics of the events leading up to the wedding.

First the Bridal Luncheon - a Mexican Fiesta style at the Mother of the Bride's home:
Bridesmaids enjoying some of the delicious food and refreshments

Bridesmaids opening their gifts
Ashley with her mother (on left) and aunt (right)

The Rehearsal Dinner:
Jon and Ashley exchanging gifts

My family - myself, son Jon, Mike (my youngest son) and Jerry (my husband)

 The Big Day - Bridesmaids getting hair and make-up done at my house:
Great pics taken by Bridesmaid Heather Rickelman


Ashley and Angela (Matron of Honor) having some fun
Ashley with hair and make-up being finished

Ashley getting finishing touches on her hair


The Groomsman getting ready - pictures taken by my husband:
Best Man Matt Miller and my son Mike - trying to tie their bow ties

The Groom and his Groomsmen all dressed - a handome bunch!

The Bride and Bridesmaids putting the finishing touches on just before the Wedding:


Bridesmaid Sarah and Matron of Honor Angela


Ashley just before the Wedding

After the Ceremony:

The Bridesmaids - all so beautiful!

The Groomsman getting ready to have their picture made by the real photographer

Mother and Son's Dance at the Reception

Another Picture of The Beaming and Happy Couple!
Wedding Jewelry:
I mentioned in my previous post I would show some pictures of the Bride's jewelry that I designed.  For the necklace I used Swarovski crystal pearls in Cream and Rose Gold, then Swarovski crystals in Palace Green and antique brass bead caps.  I used antique brass wire to wire wrap the beaded links and used a bit of antique brass chain for the end. The earrings have the same beads and antique brass ear wires.

Bridal Necklace and Earrings


For the bridesmaid jewelry I used a small antique silver heart on which I handstamped their first initial.  Then I added a small dangle with Swarovski crystal pearl in Rose Gold and put both on a pretty antique silver chain.  The earrings have larger matching crystal pearls with antique silver bead caps and clear Swarovski crystals.

Bridesmaid Necklace


Bridesmaid Earrings

All in all, I felt the wedding was a huge success.  I will post some pictures taken by the professional photographer in a week or two - I'm sure they will likely be better than mine - but I still enjoyed capturing the moment with my amateur style pics!


Sunday, May 12, 2013

Getting Ready for a Wedding


In just five days, we will be having a wedding in my family.  My oldest son Jon is getting married on Friday May 17th.  Such a joyous and hectic time!  I spent today with Jon and Ashley (my soon to be daughter-in-law) taking care of some last minute items.

First I framed the "guest book" - which is actually a poster sized piece of art filled with hearts on which the guests will sign.  Ashley found this on Etsy.  She wanted a distressed looking white type frame, but alas, none could be found that were the right size.  So I found a plain light brown one and sponged it with cream colored acrylic paint giving it a nice vintage look.  We will set it on an easel for guests to sign in on.


I also worked on the bridesmaid jewelry - which I'm still finishing up on. But here's a sneak peak at one of the necklaces and pair of earrings.


I've already finished Ashley's necklace and earrings, but will wait to share pictures of them until after the wedding as I think she wants to save showing them until the Big Day.

Have also been getting the house ready as we are expecting some house guests.  Finally finished decorating my guest bedroom.  I've never had a romantic or feminine room - I've raised two boys and my house has always been filled with boys and all the things that go with them.  But when we did a remodel last year, I made some changes.  And one of them was making the guest room - which over the years had hosted many of my two sons' friends - into a softer prettier room.

I painted the walls a soft yellow and hung curtains in a pretty gold sheer fabric with beaded fringe - I love anything beaded, you know!  The bed has a light yellow bedspread with a light blue quilt at the bottom.  Some vintage looking pictures and lamps finish the look.


As for what I will be wearing at the wedding, I have found a pretty navy blue dress embellished with - what else - beads!  Here is the dress, shoes, a pretty beaded purse I found, and a beaded hair clip.  By now you know I like beads.  You know, I could have beaded the hairpin myself, but found one I just loved on Etsy from DesignsbyDeb. 


I forgot to photograph the shawl I bought, but it is a pretty sheer silver with - what else- more beads!  Will share some pics of the wedding after it's all over!

Thursday, May 2, 2013

Handmade Earring Wires With a Vintage Touch

I recently wrote a post on my Gemstone Drop Jewelry - a collection of my gemstone pendants and drop earrings.  The earrings are all made with my handmade earring wires in either antique bronzed copper or oxidized silver.  Well, I made so many pairs of earrings for this collection that I used up my supply of handmade ear wires I made a while back.  So this week I have made another batch and thought to share them with you all.

I prefer a vintage look so chose a copper wire with a burnished or bronzed finish.  For the silver, I started with a bright silver wire and then after making the earring wires, oxidized them for an antiqued look.  I use liver of sulfur to oxidize my metals, but for a quick easy DIY way to oxidize metal, you can actually use a hard boiled egg in a plastic bag ... you can read one of my old posts on how to do this here.

It might seem ridiculous to some, but it is always amazing for me to see plain wire transformed into something pretty and useful like earring wires.


And then to take the transformed wires and add some beautiful drops and dangles for a finished jewelry design ... like these:


In case anyone is interested in making your own earring wires, I have a previous post on How To Make Fish Hook Style Earring Wires.  

Thanks so much for visiting!