Wednesday, December 9, 2015

Make Your On-Line Photos Pop With This Photoshop Tutorial!


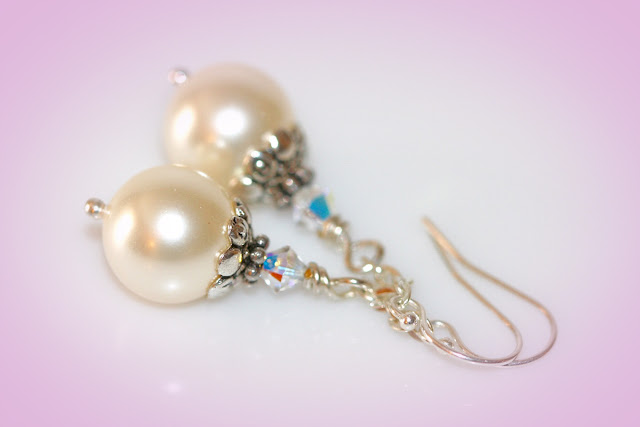
If you sell anything online, you know how important it is to produce high quality images to showcase your designs. In this post, I will show how I use Photoshop to edit my images to give them a little pizzaz.  You can take an ordinary photo and transform it into something truly amazing like the BEFORE and AFTER photos above.

Let me preface this tutorial by saying that I am using the approach that you know very little about Photoshop. If you are an advanced or experienced user, you might find it overly simplified.  That being said, I have tried to break every step down incrementally to show you exactly how it is done.

In this tutorial, I am using a Mac computor with Photoshop C6. Since I design and sell jewelry, I will be using a photo with a pair of earrings as an example.

Okay, let's get started!
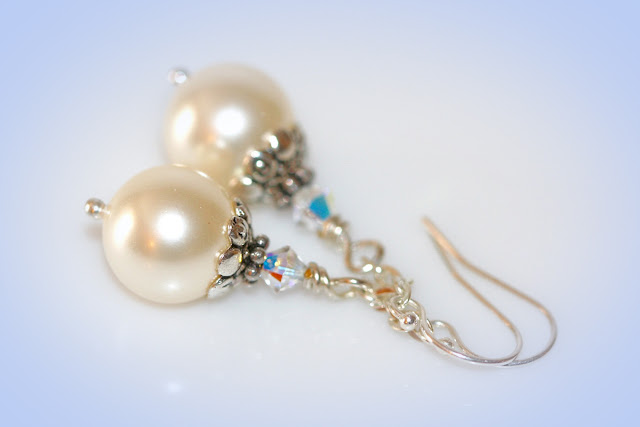
First make sure you have a high quality photo that is crystal  clear. Here is my original photo without editing other than cropping the size down.


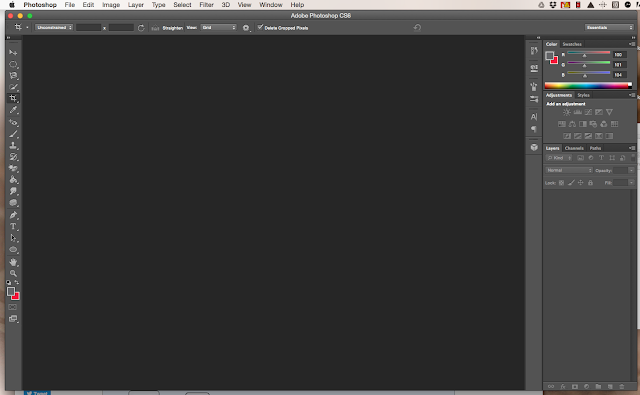
1.  Open up Photoshop. Here is a screenshot of my Photoshop screen:


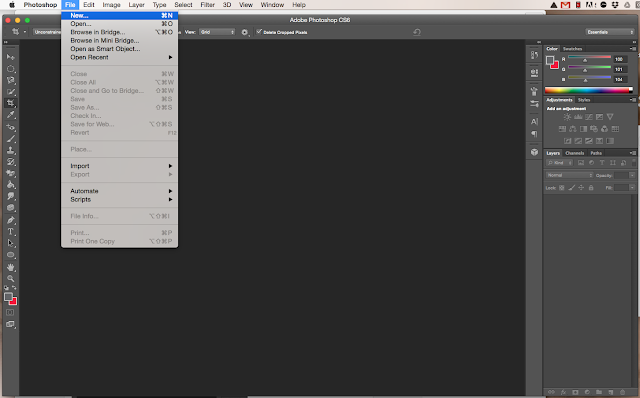
2.  Create a new file. To do this click on File at the top of your screen and in the drop down menu click New:


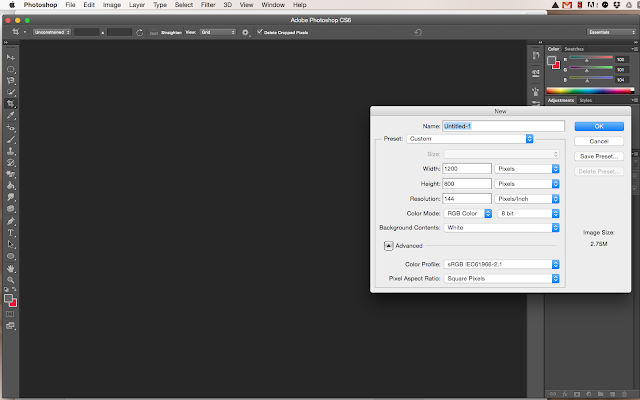
3.  A pop-up window will now appear prompting you to name your file.  By default it is called Untitled.  Rename it - I am naming my file Earrings1. In the same pop-up window you can set the size.  The size will likely be a default size, so be sure to check and change the size if you need to. I have set the size of my file to 1200 pixels width by 800 pixels height.  Now click OK.


Here is a screenshot of my new blank file:
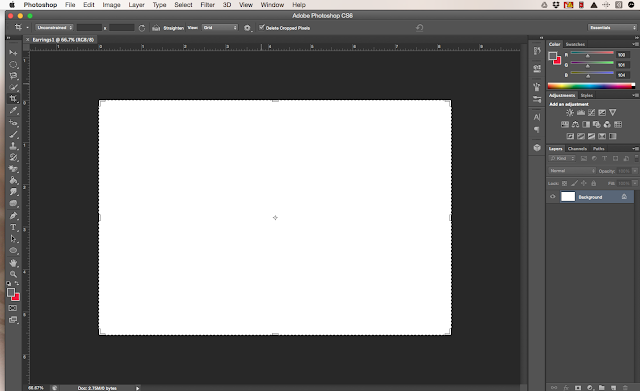


4.  Duplicate your layer by right clicking on Background layer, then select Duplicate Layer.
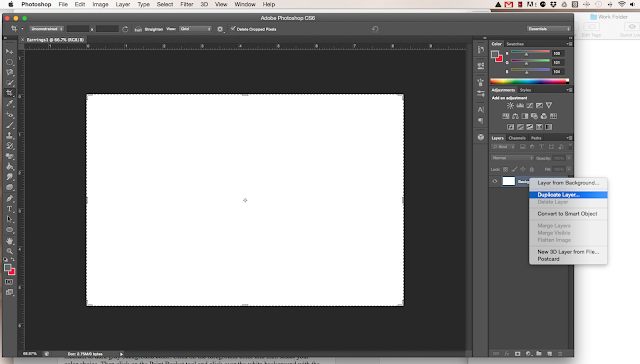


You will now want to work in your Background copy layer. Notice the Background Copy layer at the right side of your screen is highlighted - this is how you know that you are working using that layer and not the original Background layer.
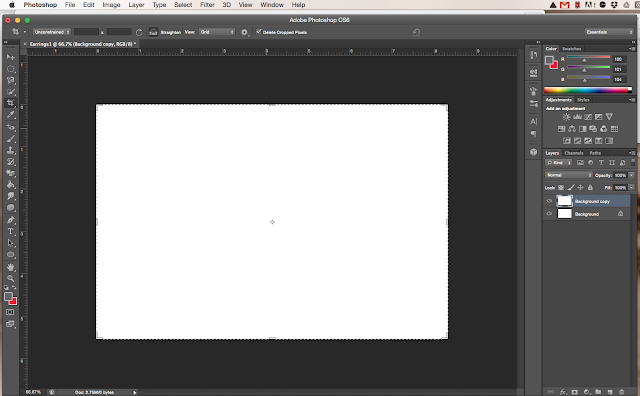


5.  Now working in your Background Copy layer, choose a foreground color. To do this, click on the Foreground Color icon at the left of your screen - it looks like two little colored squares.  Clicking on the top little square of this icon will cause a pop-up window to appear labeled Color Picker (Foreground Color.)  Note that if you click on the bottom little square, you will be selecting a Background Color instead of Foreground Color.

What's the difference between Background and Foreground?  Photoshop uses the foreground color to pain, fill and stroke colors.  The background color is used to fill in erased areas of an image.

Now in the Color Picker window click on a color of your choosing.  Since I want some contrast against the somewhat light grayish white background in the photo, I am selecting a medium to dark gray background color. Press OK to confirm your color choice.


6.  Next click on the Paint Bucket tool on the left side of your Photoshop screen.  Left click the little paint bucket over the white background with the paint bucket to "paint" your foreground.  Here is my new gray colored foreground:


7.  Now drag your photo to inside the file.  You will have a big X across the screen until you have finished placing the photo.  To place the photo, click on the check mark at the top of your screen.  
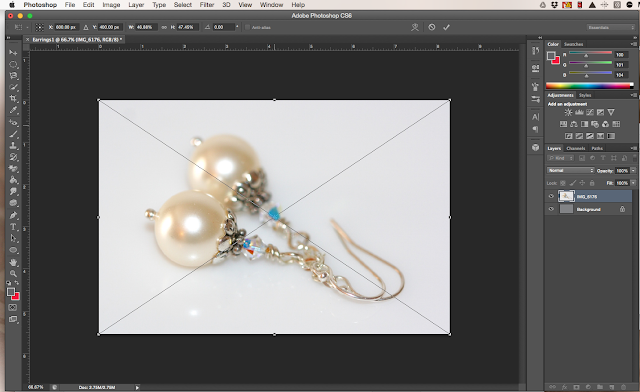


After placing it, the big X across your photo will disappear:
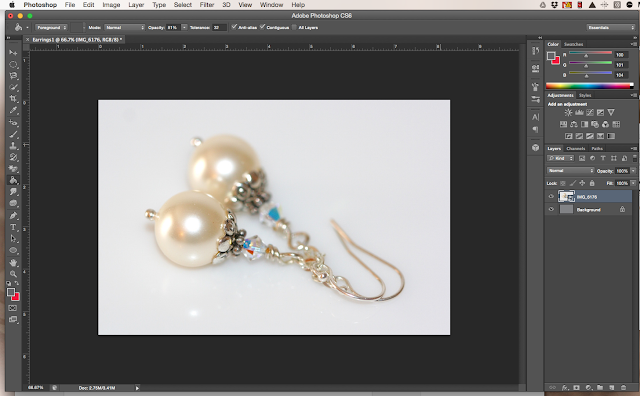


8.  Click on the Ellipse tool and place your cursor in the middle of your photo and left click.  A small box will pop up prompting you to Create Ellipse. By default, the size  of the ellipse is set to 100 x 100 pixels as shown below:
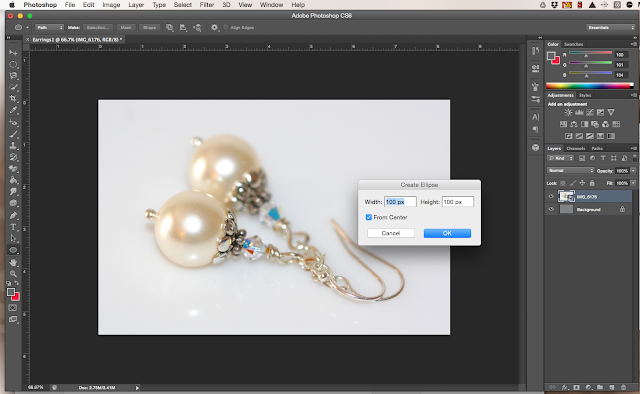


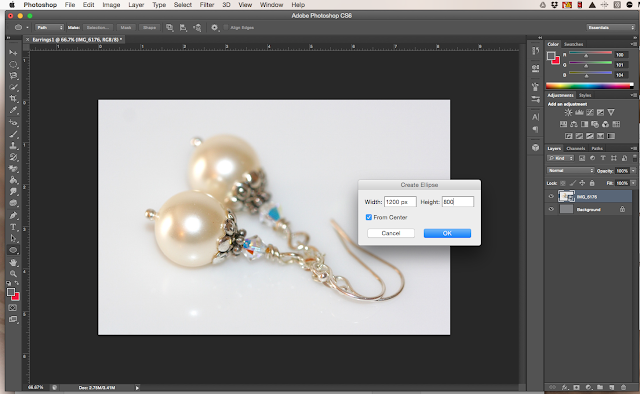
Go ahead and change the size to 1200 x 800 pixels.  Then click OK:


9.  You will now see an elliptical oval encircling your photo. Now right click anywhere outside the ellipse shape and click Make Selection in the pop-up window:
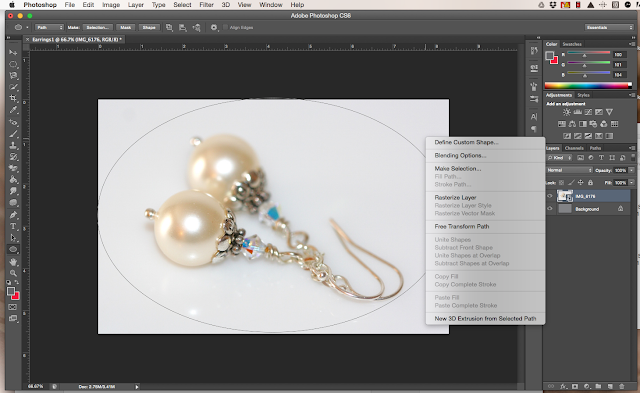


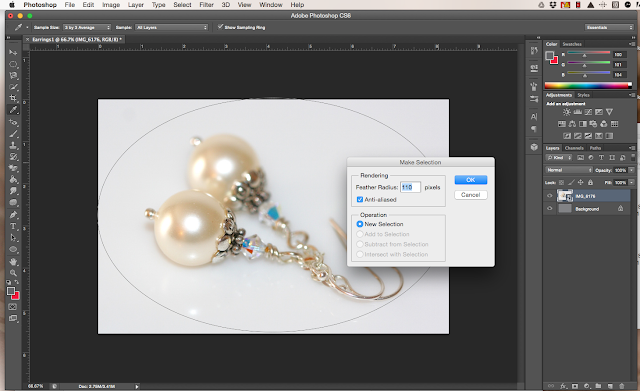
A small box will appear entitled Make Selection. You will see an option for Feather Radius which by default is usually set to zero.
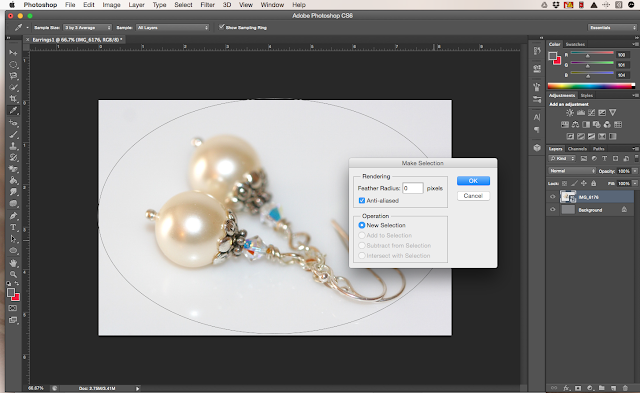


I am setting the feather radius to 110.  The higher you set it the more "feathery" the edges of your photo will be against your darker background.


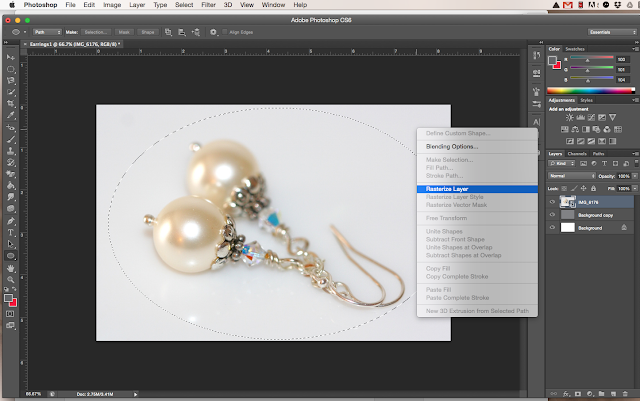
9.  Now right click again outside the dotted elliptical shape and click on the option Rasterize Layer.


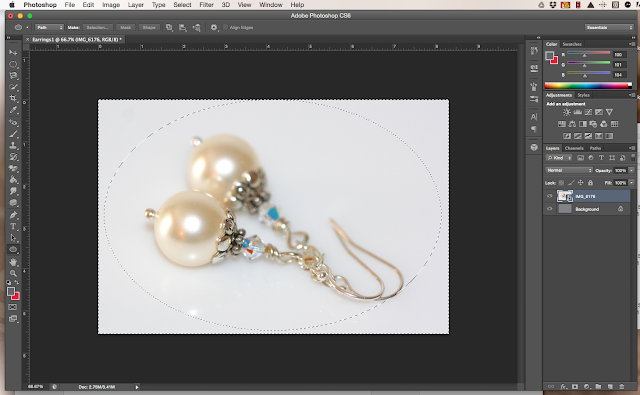
10.  Next click on the word Select at the top of your Photoshop toolbar.  Then from the options given click Inverse.


Now your file will also have a dotted line around the entire file looking like this:


11.  Click on Edit at the top of your Photoshop tool bar and from the options click Clear.  Here is what your image will look like:
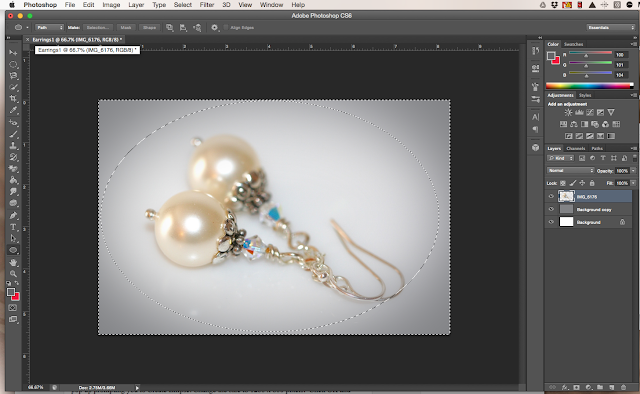


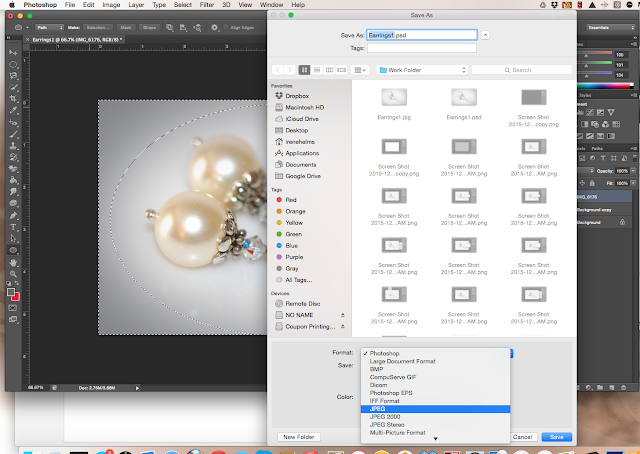
12.  Now you are finished except for Saving your file.  To save, click on File at the top of your Photoshop toolbar, then click Save As and unless you want to change the name of your File name just click Save.  Be sure to choose from the options given where you want to save your file to.  In the example below I am saving it to Work Folder but you can save it just to your Desktop if you prefer.  Note that this will save it in PSD format which will enable you to have this file to come back to and edit if needed.


Now you need to save the file in JPG format.  To do this, again click on File, then Save As, then change the format to JPG and click Save:


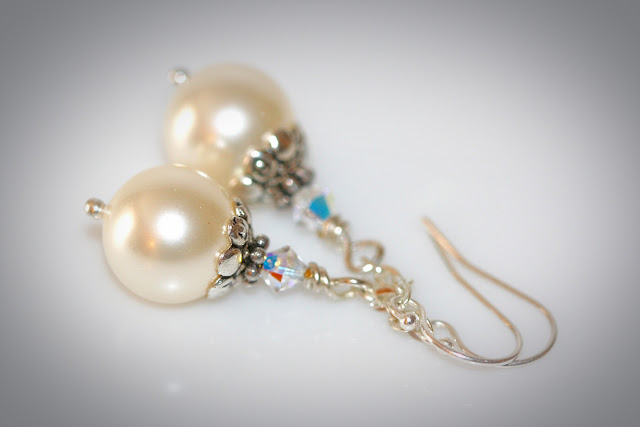
And here is your finished photo:


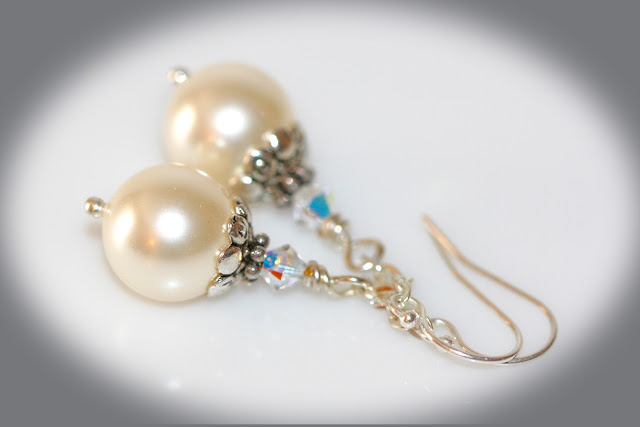
If you like more definition in the different foreground and background colors, just lower the feather radius from step 8 in the tutorial.  Here is another photo of the same earrings using a lower feather radius of 30 instead of 110:


There are lots of other ways to individualize your photo. For example, I used a neutral gray foreground color in the example above.  Here are some photos of the same image using blue and pink colors for the foreground:


Although I am far from being an expert in photo editing, I do hope this tutorial has been helpful!  I have been using Photoshop for about 2 1/2 years and have learned to love it. But it has at times been a love-hate relationship.  It is not a very intuitive program for someone like myself without any formal education or training in photo-editing.  Put simply, it is not always easy to figure out what I am doing. I have learned and continue to learn techniques literally millimeter by millimeter. So this is why I wanted to share this one small technique.

I welcome questions, comments and feedback!

Till next time,
Irene


Sunday, May 10, 2015

Upcycled Vintage Rhinestone Earrings - From My Grandmother's Collection

Last week I went to say good-bye to my grandmother who passed away just three weeks shy of her 103rd birthday. The service was inspirational and was truly a celebration of her long and meaningful life.

Although it is impossible to completely capture the essence of her life, I feel compelled to at least note some of life highlights of my Grandmother - Creola May Starnes:

  • Born in Arkansas in 1912. 
  • Moved with her family to North Carolina in her early teens.
  • Married at age 15 to my Grandfather and raised five children - my mother being the oldest.
  • Spent countless hours volunteering and being active in her church.
  • Earned a business degree while in her forties - keep in mind this was in the 1950's when many women did not go to college much less consider getting a business degree.
  • Established the first church daycare center in the city of Kannapolis, NC because she saw a need for working mothers to have access to child care.
  • After raising their five children, she and my Grandfather moved to Winston Salem, NC and served several years as house-parents for adolescent parentless boys.
  • Retired and moved to Waxhaw, NC where she became an advocate for seniors and their caregivers.
  • Obtained certification in Gerontology from Livingstone College and served as President of the Union County NC Chapter of AARP.
  • Retired a second time at age 78 and became caregiver for my Grandfather who had developed Alzheimer's - she cared for him until his death in 1989.
  • After surviving her husband's death, she lived another 26 years until the age of 103.  Her legacy continues through her 16 grandchildren, 17 great-grandchildren and one great-great grandchild.

I like to try to keep the memory alive of those who I have known and loved. I was fortunate enough to be given some of my Grandmother's old vintage jewelry. And I decided that I would like to repurpose some of these treasures so that I could wear and cherish them while continuing to honor her life for years to come.

This pair of vintage clip-on rhinestone earrings has lots of history and I could not bear thinking of these pretty pieces just sitting somewhere in a drawer. So I decided to convert them into a pair of post earrings that I could wear and enjoy and remember my Grandmother every time I wear them.  Here is what they originally looked like:


The first thing I had to do was to remove the screw-on clips. I did this by snipping them with a pair of wire cutters, then filed off the rough edges with a jewelry file. This is how they look with the backs snipped off and filed:


Next, I found a pair of post earrings to set the rhinestone dangles onto. I liked these pretty antique silver posts that I bought from VintageJewelrySupplies.com:


Then I used E-6000 glue to attach the dangles onto the posts.  I use E-6000 for any jewelry project requiring glue because it holds forever - and I do mean forever! The only tricky part was finding a way to hold the posts upright and flat in order to give time for the glue to set - it takes 24 hours for E-6000 glue to set.  So it is important to find a way to stabilize it while it sets. 

What I came up with was folding and taping a piece of bubble wrap, then sticking the posts down into the bubble wrap. Then I used a dab of glue (it only takes a dab) to adhere the rhinestone dangles onto the posts. To make sure there was good adherence I placed a piece of tape across the top of the earrings and let it set for 24 hours:


And after 24 hours, here is what they looked like:


I am quite pleased with the outcome and can't wait to wear them!  I just love the idea of wearing something that my Grandmother once wore.

I will not be selling this pair of earrings, but I have lots of other items for sale in my two Etsy shops: 

DJAjewels.etsy.com

EyeglassChainsEtc.etsy.com

Sunday, March 29, 2015

Rose Gold Jewelry - New Designs

Rose gold jewelry has become one of my new faves!  I only recently started using rose gold but I have to admit I have fallen in love with it. The color is a warm rich color with a copper tint to it. And, in fact, rose gold is about 22% copper.

This week I thought I would share some of my newest designs in rose gold.

This first design is a lanyard using a heavy weight rose gold chain. It has a nice substantial feel to it. I made it so it can be worn either as an eyeglass necklace, ID-Badge or key  holder, or both. Or just wear as a pretty necklace by removing the detachable ID clasp.

Rose Gold Lanyard with Detachable ID-Badge Holder

The clasp easily detaches from the round loop - use the loop to use as an eyeglass necklace!

Four Ways to Wear It!

This next design uses a lighter weight more delicate rose gold cable chain. I custom made this for a customer, and will be replicating this design and offering it soon in my EyeglassChainsEtc. Etsy shop.
Custom Lightweight Rose Gold Lanyard

These earrings have the same light weight rose gold chain along with Swarovski crystal pearls in a color called what else - Rose Gold! You can find these in my DJAjewels Etsy shop.
Rose Gold Pearl Earrings


Till next time!
Irene

DJAjewels.etsy.com
EyeglassChainsEtc.etsy.com

Be sure to follow me on Pinterest!

Wednesday, February 18, 2015

Tutorial: How to Make Spiral Bead Caps


This week I have a nice little tutorial on how to make your own spiral bead caps. This post is part of my "Test This Tutorial" series in which I find a tutorial on Pinterest and try it out for myself.

I found this tutorial at LisaYangJewelry.com. In Lisa's tutorial, she shows how she makes these bead caps, and she references a tutorial from JewelryMakingJewelry.com written by Rena Klingenberg. I urge you to check out both of these sites as each one puts a slightly different twist on the tutorial. I think it's always good to see how different people approach a project design because we all find our own little unique ways of doing things.

To make these DIY bead caps you will need the following items:

  • Wire - I used 20 gauge silver tone Zebra wire
  • Beads - either 8mm or 10mm - I used an 8mm round glass bead
  • Wire cutters
  • Round nose pliers
  • Flat nose pliers
  • Jewelry file
  • A round or dome shaped object for forming the dome of your bead cap - I used a small dapping punch - but I found the end of a pen also works quite well


Cut a 2 1/2 inch piece of wire. I actually make these in pairs, so I go ahead and cut two pieces of wire.

File the ends of each piece of wire using the jewelry file. This makes the ends nice and smooth so they will not catch on clothing or skin.

Now use your round nose pliers to begin a simple loop at one end of the wire.


Next use your flat nose pliers to grasp the loop and begin making your coil.  Use your fingers to shape the wire into a spiral.


Now here I did something not mentioned in Lisa's and Rena's tutorials. I found I had a little piece of wire sticking out from the coil - see it in the last picture above?  I used my round nose pliers to "tuck" it in just beside the last coil.


Much better!

Now it is time to dome your bead cap so that it fits nicely over a round bead. In Rena's tutorial, she places the spiral through the end of her round nose pliers and pushes the edges down to make the dome. Lisa used a different technique - she used a steel doming block to form the dome.

I took Lisa's suggestion and used a dapping punch to form the dome. I simply placed the bead cap over the top of the dome and pushed downward - and it worked great. 


Now because I know everybody doesn't have dapping punches, I also tried it using the tip of a medium sized pen - and it really worked quite well. You can really use your imagination and use whatever is handy in your home.


And finally, here are my bead caps!


And here is what they look like on a bead:


These were so much fun to make, I made a whole bunch of them. This time I used silver plated craft wire - and they look beautiful!


Now I can't wait to use them in some pretty jewelry designs!

I hope you will try making some of these bead caps yourself. If you do, I would love to see them!