

- To individualize my design, and
- I want to use my altered bottle as a jewelry display whereas ArtfullyMusing's bottles are more for pure decoration.
I do suggest you read her blog post as well as mine and view her beautiful altered bottles!
Here is how I made my altered bottle jewelry display.
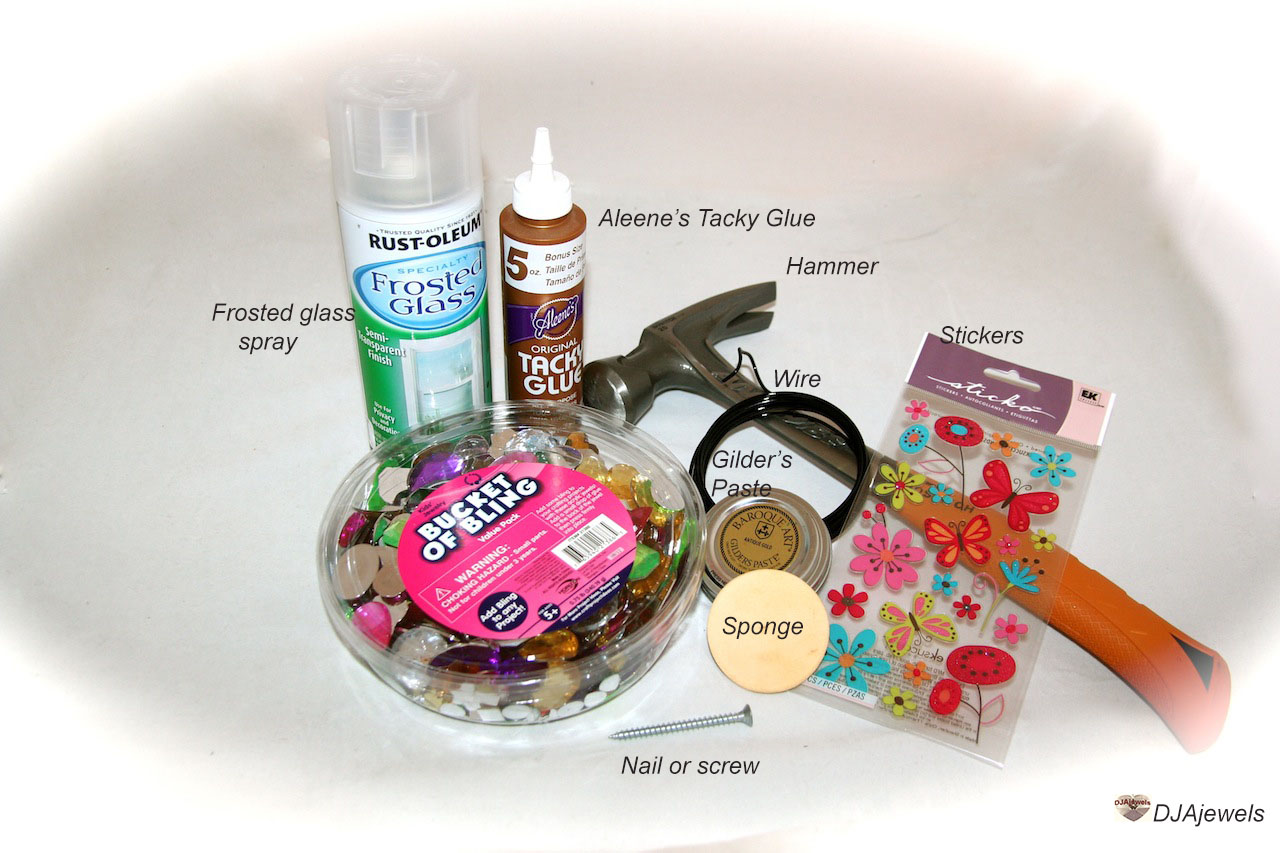
Supplies:
- Bottle and bottle cap - any clean glass bottle with labels removed. I used a pretty green olive oil bottle.
- Frosted Glass spray pain.
- Gilder's Paste.
- Sponge - I used a make-up sponge as recommended by ArtfullyMusing.
- Aleen's Original Tacky Glue - I bought mine from Michael's.
- Hammer.
- Nail or screw.
- Heavy gauge wire - I used 12 gauge which I bought from Michael's in the Floral section of the store.
- Medium gauge wire - I used 20 gauge gunmetal wire - not pictured.
- Embellishments - I used flat back acrylic rhinestones and stickers (but your imagination is the limit - you could cloth, paper, ribbon, etc.)
- Paint brush and paper towel - sorry, also forgot to include this in the supplies picture.
1. Remove all labels from your bottle and clean well.
2. Use your paint brush with the end wrapped in a paper towel and push it into the bottle opening so you can use it as a "handle" to spray paint your bottle.
3. Spray your bottle with the Frosted Glass holding your paint brush handle and rotating it to give it a good coating. Make sure you are in a well ventilated area - I did this outside. Allow to dry - it only takes about 10 minutes to dry.
4. After the Frosted Glass is dry, apply the Gilder's Paste. I used a color called Antique Gold, but it is available in other colors as well. Gilder's Paste is a wonderful pigment which can be applied to a variety of surfaces to give an antiqued or vintage patina. You can buy Gilder's Paste at a variety of sites - I bought mine from Vintage Jewelry Supplies. Use your sponge to dab and pat the paste onto the bottle. Use as much or little as you want.
5. Allow the Gilder's Paste to dry - this does take about 12 hours.
6. Now add your embellishments. I bought a "Bucket of Bling" from Walmart with acrylic flat back rhinestones that I glued to the bottle using my Aleen's Original Tacky Glue.
For the bottle topper:
1. Place your bottle cap on a firm flat surface and then hammer a nail or screw through the center to make an opening. Then screw the bottle cap back onto the bottle.
2. Cut four lengths of your heavy gauge wire - I cut my wire to 8 inch lengths - my bottle was 9 inches tall. You can adjust according to the height of the bottle, but basically you want the wire long enough to extend well into the inside of the bottle.
3. Now make your hooks on the ends of each piece of wire by bending them over something round to make a loop - you can use anything such as magic marker or candle. It's best to do all four pieces of wire together in order to make the loop uniform in shape. Then bend the tip of each wire away from the loop to make a small hook - this part can be done individually rather than as a group. You can use your fingers or a tool such as flat nose plier.
4. Cut two pieces of your medium gauge wire - each about 5 inches.
5. Hold your four pieces of heavy gauge wire you have made hooks with together and wrap them together near the top using your medium gauge wire. Repeat this with the other piece of medium gauge wire an inch or so below your first wrapping - doing two separate wrappings makes it more secure.
6. Mold and shape your hooked ends into a four prong topper by just pushing the hooks around in different directions with your fingers.
7. Now insert the tails of two of the wires through your bottle cap. Spread the other two pieces of wire outside the bottle in opposite directions - these will be used to wire wrap the bottle cap. To wire wrap, simply wrap each tail of wire around the bottle top. I used a flat nose plier to help with this and then made a small decorative loop at the end which I pressed up against the bottle top.
Here is a close-up view of the wire topper:


And here's the finished design - viola! You now have a pretty altered bottle jewelry display. Use it to hang necklaces, earrings or whatever!
No comments:
Post a Comment